
Today's online shoppers don't just want to view the image of an online product. They expect a more immersive experience that allows them to see how the product will look when worn or used. They want to rotate it, zoom in, customize colors, and preview it in their own space.
But implementing 3D product visualization is more than just creating attractive renders. It involves building optimized 3D digital assets and choosing the right workflows. It also includes integrating with platforms like Shopify and WooCommerce. Along with that, it focuses on maintaining performance and creating scalable systems that support future growth.
In this article, we will go through how 3D product visualization works and how brands implement it in e-commerce. We will also cover the technologies involved in pricing and common implementation challenges. How businesses are using interactive 3D experiences to improve sales conversions and reduce return rates will also be covered.
What Is 3D Product Visualization for E-commerce?
3D product visualization for e-commerce is the process of making three-dimensional images that users can view, rotate, zoom in, and customize on the website or app. Instead of relying on static images, many e-commerce brands now use photorealistic 3D models. It gives digital shops and experiences that behave more like real products in a physical store.
In practically all e-commerce applications, 3D product visualization can include:
- 360-degree product viewers
- Interactive product configurators
- Photorealistic CGI renders
- Augmented reality (AR) product previews
- Exploded-view product demonstrations
- Lifestyle and digital showroom experiences
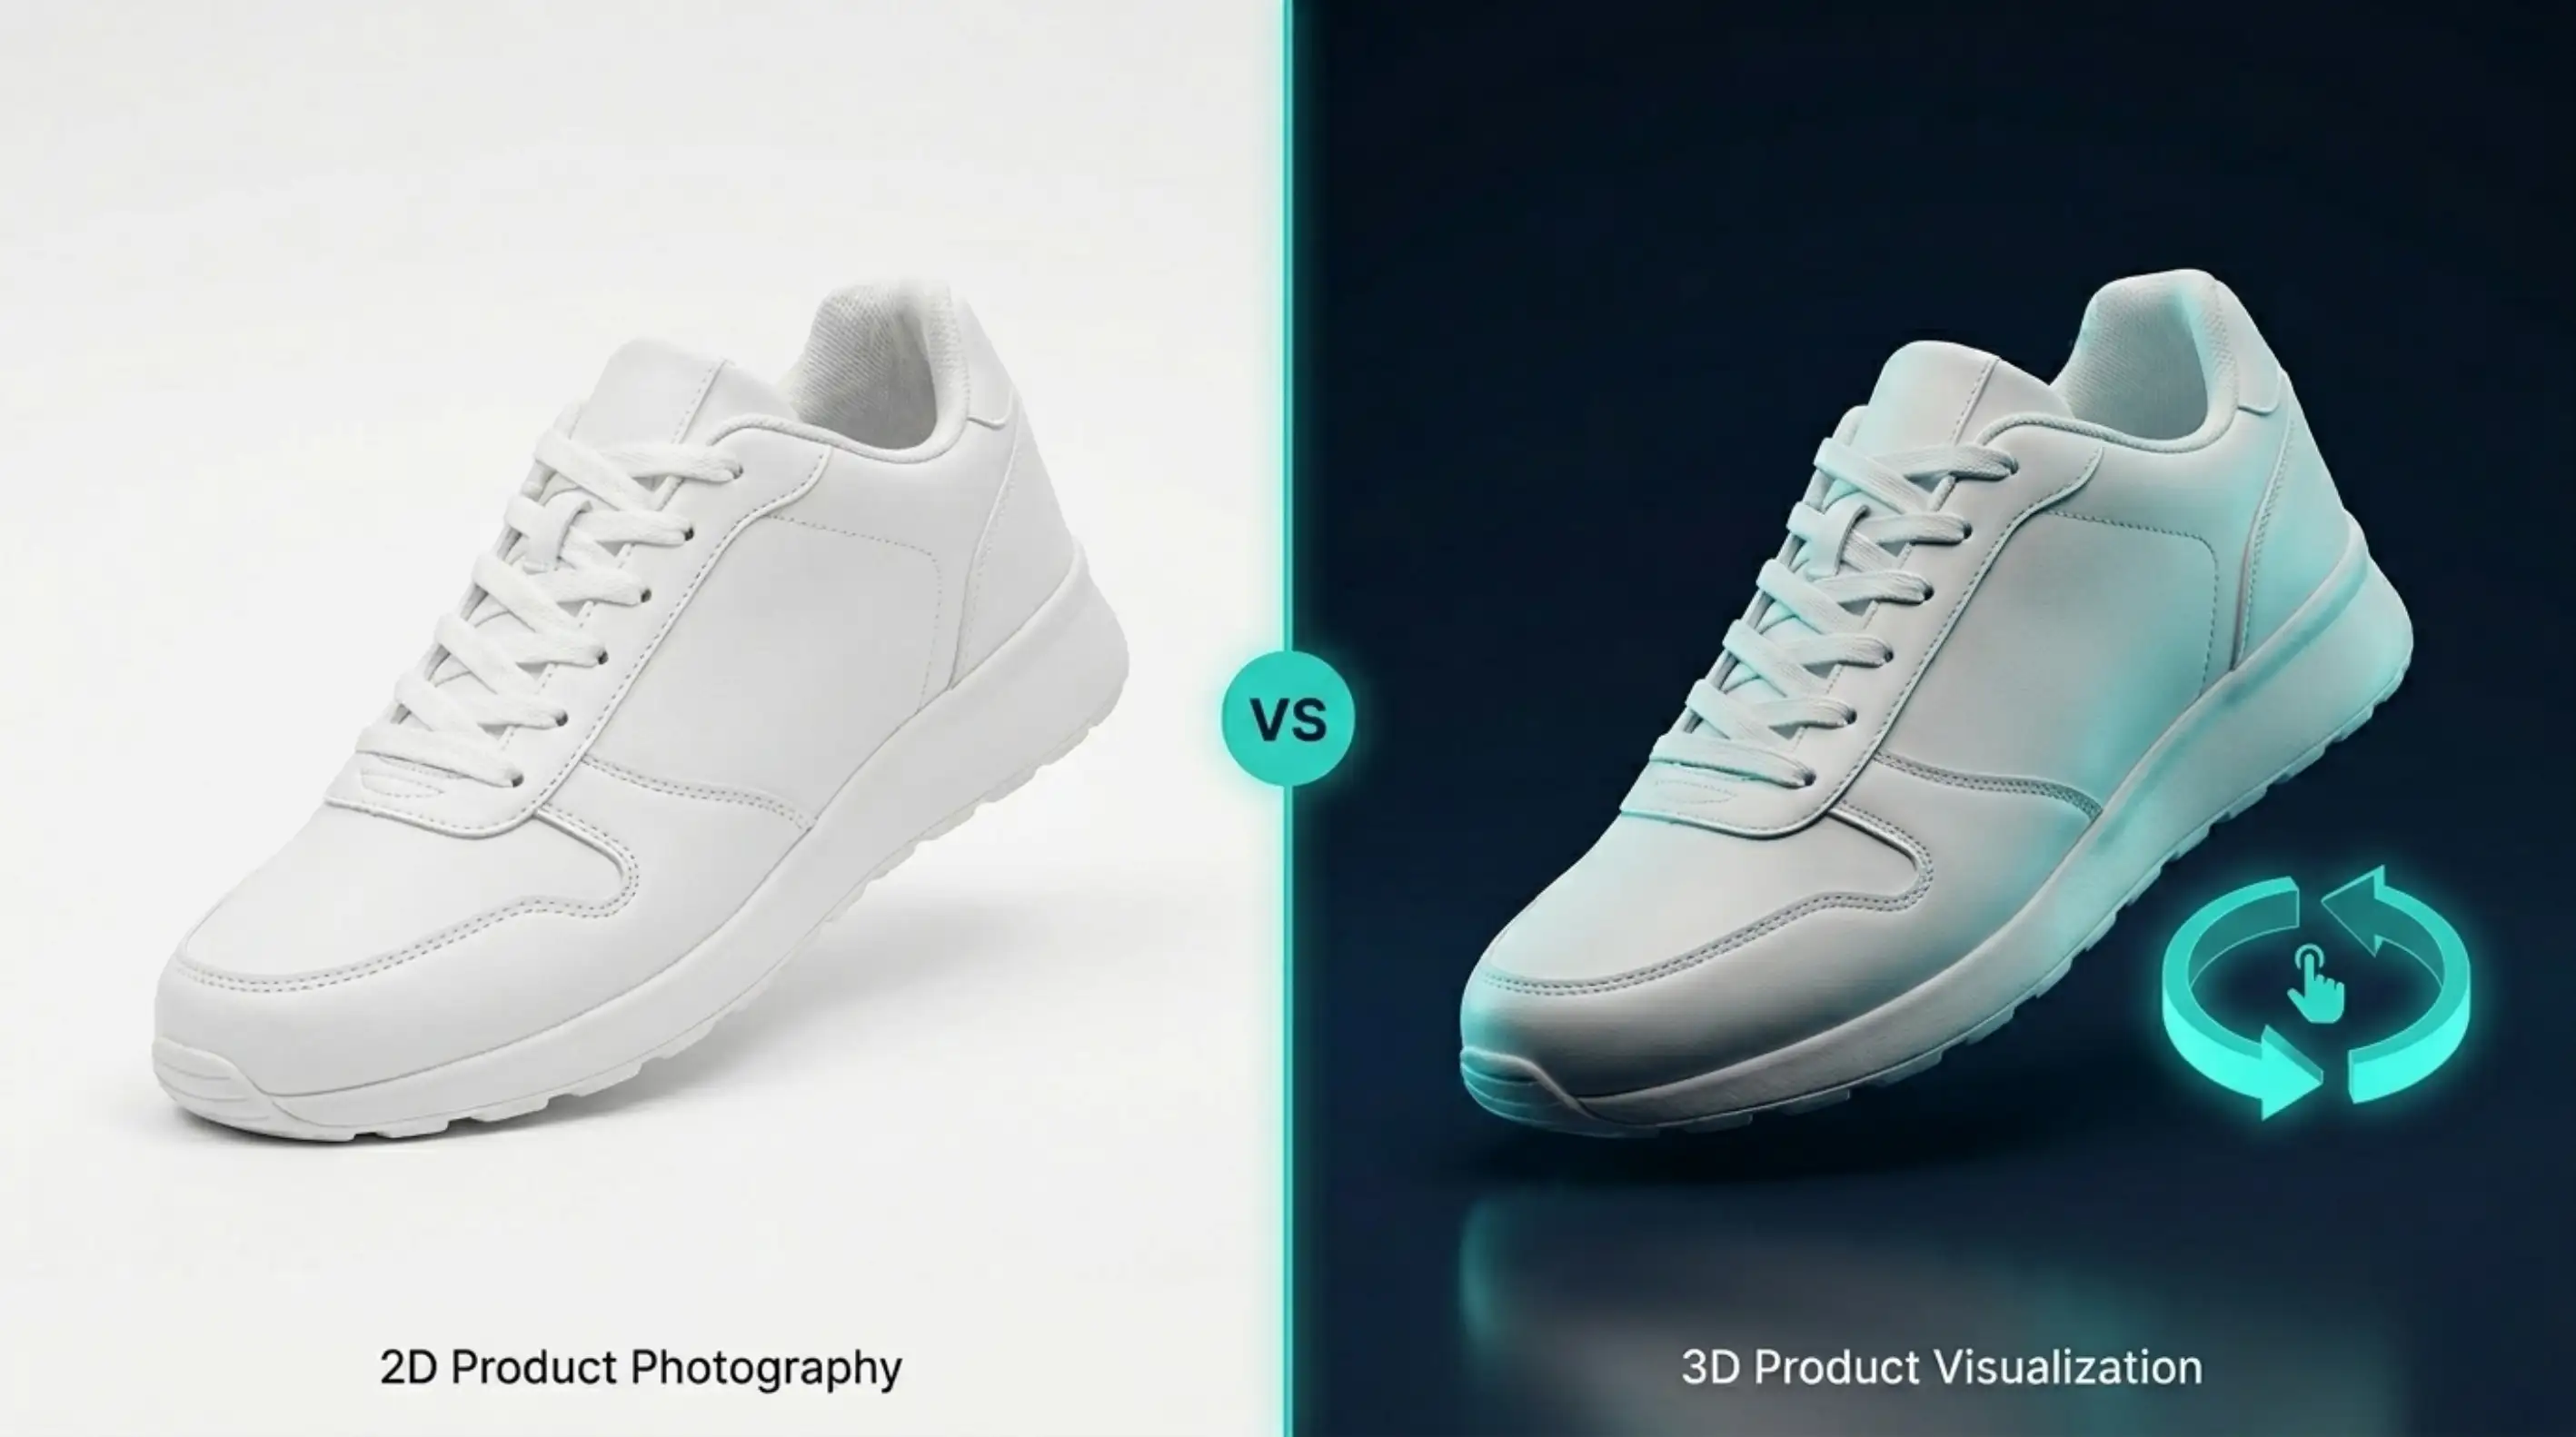
Why Static 2D Photography Is No Longer Enough
White background product shots, lifestyle images, and close-up photos used to be enough to sell products online. Due to rapid change in modern e-commerce, nowadays some online shoppers expect immersive, interactive product experiences.
One of the big challenges with traditional photography is that it only captures a few viewpoints. Customers can't interact with products the way they would in a physical store. As they can't rotate, customize, design, or virtually try products before purchasing, compared to digital shopping tools, it feels outdated. This limitation leads to one of e-commerce's largest operational problems, which is high return rates.
According to market research, the global 3D product visualization market size was valued at $2.1 billion in 2024, and it is expected to hit $9.6 billion by 2033.
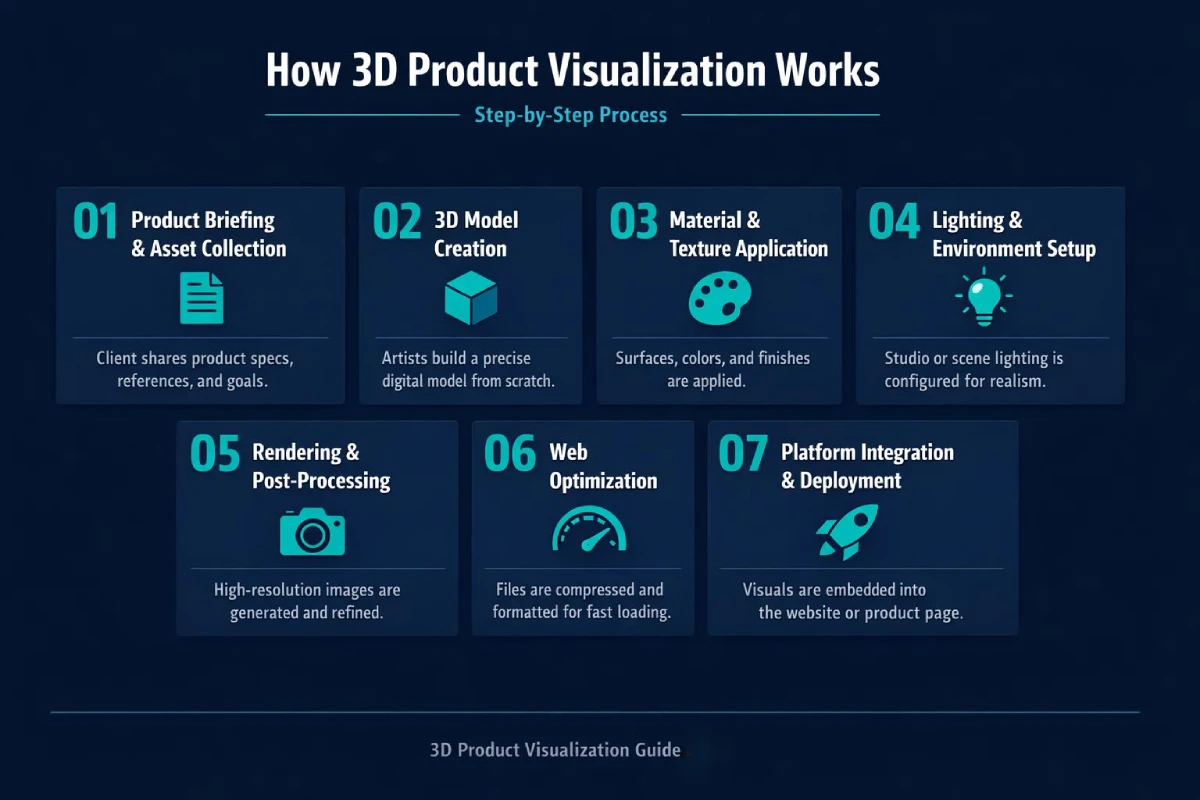
How 3D Product Visualization Works - Step by Step
3D product visualization is not only a single process. It follows a step-wise, detailed process for creating highly detailed digital 3D models.
Here's the step-by-step process that usually gets followed in product visualization:
Step 1 - Product Briefing and Asset Collection
Every 3D product visualization starts with gathering accurate product information and defining the project scope. This stage actually works as the foundation of the entire production pipeline. Brands usually provide CAD files, technical drawings, material samples, and other necessary information.
This information helps a 3D professional accurately recreate the product digitally. A well-structured briefing and asset collection help to reduce revisions in the workflow. It also ensures the final visualization aligns with all the requirements.
Step 2 - 3D Model Creation
3D artists start building the digital model once all the briefing and asset collection are done. This process involves recreating geometry, proportions, curves, and structural details.
Based on the requirements of the specific project, artists use 3D modeling. They also focus on CAD-to-3D conversion, photogrammetry, and AI-assisted workflows as the primary methods to create product models. Realism and performance of a product model are equally important. This ensures that the model should include sufficient detail to be convincing and also be lightweight for fast loading times.
Step 3 - Material and Texture Application
Once the model is finalized, the next step is to define the product’s visual appearance through materials and textures. Materials in 3D are used to control how the product reacts to light, including reflections, roughness, transparency, gloss, and metallic properties. With PBR, these physical qualities can be recreated more accurately in a digital environment.
Textures add realistic details such as leather grain, fabric weave, wood patterns, metal finishes, glass clarity, or plastic effects. This stage is also where product variations are created, including different colors, textures, and finishes for interactive configurators and dynamic product viewers.
Step 4 - Lighting and Environment Setup
In 3D product visualization, lighting and environment setup play a major role in making the product look realistic and appealing. Proper lighting helps materials, textures, and finishes appear more natural and visually attractive.
Artists can place the product in a clean studio setup, lifestyle environment, digital showroom, or configurable product scene. Different lighting setups can then be used to create technical, premium, lifestyle, or campaign-focused outputs.
They can also set the product up on a virtual showroom board in various lighting configurations to simulate different moods and product uses. Proper lighting not only enhances realism but also helps communicate brand identity. Whether the desired look is soft and lifestyle-focused, sharp and technical, or dramatic and luxury-oriented.
Step 5 - Rendering and Post-Processing
Rendering is the final step that involves the production of 3D products and their visualization in the form of images, animations, and 360° rotations (spins). Specialized offline rendering engines like V-Ray, Arnold, Redshift, and Cycles are used to create visually appealing and photorealistic products. It focuses on simulating the behaviors of light.
For interactive solutions like web viewers and AR applications, real-time rendering is prioritized. Post-processing is done after rendering, where corrections and adjustments of sharpness, quality, and color balance are made to meet the requirements of the brand and final marketing.
Step 6 - Web Optimization
3D assets must be optimized to load and perform well on the web, on mobile devices, and across varying internet speeds. 3D models can be large and resource-intensive.
Optimization techniques reduce the size of such models and improve the quality. It reduces the number of polygons, compressing the mesh and texture, altering the Level of Detail (LOD), and progressive loading. While the target use may involve Augmented Reality (AR), web-friendly formats like GLB, glTF, and USDZ may be used. Proper optimization balances model quality with size and speeds user interactions, especially in e-commerce.
Step 7 - Platform Integration and Deployment
Once the 3D assets are optimized, they are integrated into the final e-commerce experience. Product page experiences are embedded with 3D viewers and AR features, while product variant groups are made accessible. When product assets are hosted on a CDN, interaction controls are added so users can easily engage with and explore the product experience.
The deployment phase uses tools like Three.js, WebGL, and Model Viewer to display 3D content online. Platforms such as Shopify 3D, AR Quick Look on iOS, and Scene Viewer on Android help create interactive shopping experiences that work smoothly across different devices and browsers.
E-commerce Implementation Guide: How to Add 3D Visualization to Your Store
Adding 3D visualization to any e-commerce store requires a structured process. The combination of strategy, asset creation, technology selection, and optimization is all part of the process.
Phase 1 - Self-Assessment
The initial phase of introducing 3D product visualization is understanding how it's going to add value to your business. This involves reviewing your product list to identify where 3D visualization can add the most value, particularly for hero products, best-sellers, and high-value items. It will help you to highlight items that are high-value and configurable. This phase also helps decide whether to start with a small pilot or plan a broader rollout.
Phase 2 - Choosing Your Implementation Approach
After the opportunity is understood, the next step is to move toward implementing 3D visualization. Most companies choose one of three possible options:
- The first approach is to hire a traditional 3D studio. Although it might feel more expensive, they deliver high-quality results since they handle modeling, rendering, and production.
- The second option is more flexible and less expensive, moving forward with an in-house approach, although this requires stronger internal resources.
- The third option includes SaaS platforms like Threekit or Zakeke, which provide end-to-end solutions from modeling to configurators and site integration.
Each option balances cost, control, speed, and flexibility in different ways. Most companies start with SaaS solutions and, over time, move toward hybrid or in-house setups.
Phase 3 - 3D Model Creation Strategy
Once your approach is defined, then focus on building a scalable and efficient 3D asset pipeline. The very first step here would be standardizing product data collection. This ensures all SKUs include consistent data such as product dimensions, reference images, and materials. If available, CAD files should always be included, as they improve accuracy and reduce modeling time.
This phase also involves building a library of reusable materials. This reduces time spent on applying materials in 3D software and ensures a consistent look across product lines. Clear limits for polygon count, file size, and texture resolution must also be set to avoid unnecessary production costs.
Phase 4 - Platform Integration (Shopify, WooCommerce)
Platform integration is one of the most necessary phases in implementation. Shopify makes this easier with built-in support for 3D files in product galleries. WooCommerce requires more setup, usually through a plugin or by adding a 3D viewer like Model Viewer or Three.js.
BigCommerce offers more flexibility than WooCommerce and supports 3D integration through theme customization and media elements. Advanced setups use headless systems that fully control the site using frameworks like Three.js or WebGL.
Phase 5 - Performance Optimization
Performance optimization ensures that 3D elements do not slow down page or application performance. Since 3D models are heavy, keep in mind that heavy models can impact page speed, SEO rankings, and user experiences.
Assets are typically delivered through a CDN, and techniques like polygon reduction, texture compression, Draco compression, and LOD. These help maintain performance while preserving visual quality. Users should be able to view lower-detail models first, with higher detail loading afterward.
For devices or browsers that do not support 3D, static images should be used as a fallback. The main goal is to balance visual quality with smooth performance, especially on mobile devices.
Phase 6 - Measurement and Optimization
The impact of 3D visualization becomes clear only after measurement and optimization. Brands track changes in conversion rates between products with and without 3D, engagement with the 3D viewer, time spent on product pages, AR usage rates, and return rate changes.
User interactions such as rotating models, zooming, changing colors, or using AR are tracked through event data. A/B testing between standard product pages and 3D-enabled pages is also useful for measuring ROI. The collected data helps improve the placement of 3D content and refine the viewer or configurator.
3D Product Visualization Pricing 2026
3D product visualization costs mostly depend on the complexity of the product and the type of deliverables. Simple e-commerce renders can cost a few hundred dollars, while advanced ones can cost thousands.
Here’s a general pricing overview:
| Service Type | Common Pricing Structure | Typical Cost Range |
| Interactive 360° Product Spins | Per product (image sequence) | $100 - $600+ |
| Photorealistic 3D Product Renders | Per render, scene, or product model | $50 - $3,000+ |
| 3D Product Animation Videos | Per project, duration, or complexity | $2,000 - $5,000+ |
| Real-Time Product Configurators | Subscription or custom development | $5,000 - $50,000+ |
| AR Product Experiences | Per model or platform integration | $2,000 - $50,000+ |
| Virtual Try-On Solutions | SaaS licensing or enterprise integration | $10,000 - $200,000+ |
Common Implementation Challenges and How to Solve Them
Implementing 3D product visualization in e-commerce marketing can improve engagement and conversions, but it also introduces a set of technical and operational challenges. But the interesting fact is that most issues don’t come from the 3D technology itself, but from gaps in planning, optimization, and workflow consistency.
Below are the most common challenges brands face and solutions for how to solve them effectively:
- Unrealistic or inconsistent visual quality: Fix PBR material settings, use accurate product references, align lighting with real photography, and maintain a shared 3D style guide across all assets.
- Poor website performance after adding 3D: Apply lazy loading, compress textures and geometry, set polygon/file size limits, and serve assets via a CDN with fallback images for low-performance devices.
- AR scale and compatibility issues: Ensure correct real-world units in models, test across devices and browsers, and standardize export settings for GLB/USDZ files.
- Slow production and scaling bottlenecks: Use structured product briefs, require complete reference data upfront, reuse materials across SKUs, and build a standardized pipeline for variants.
- Inconsistent integration and platform challenges: Follow platform-specific best practices (Shopify, WooCommerce, BigCommerce, headless setups), use reliable viewers, and ensure consistent embedding and configuration.
- Low user engagement with 3D features: Improve UX with clear View in 3D labels, place viewers near product images, and guide users with subtle interaction cues or default motion.
Final Thoughts
3D product visualization has become a necessary part of modern e-commerce. As today's generation's expectations have shifted towards more immersive shopping experiences, static product photography is no longer enough.
Whether it's 360-degree product viewers, photorealistic CGI scenes, or AR previews and configurators, 3D visualization helps brands improve engagement. It helps in increasing buyer confidence and reducing return rates. A combination of proper optimization, platform integration, and scalable workflows helps to create more effective digital shopping experiences.
Frequently Asked Questions
What is 3D product visualization for e-commerce?
3D product visualization for e-commerce is the process of creating photorealistic digital 3D representations of products for online stores. These basically refer to those images that users can rotate, zoom, customize, and place in their own environment.
How much does 3D product visualization cost?
The cost of 3D product visualization varies based on the product complexity and requirements. Simple 3D renders and 360° product spins typically cost $50-$600+, while advanced solutions like AR experiences and product configurators could cross $5000 to $50,000+.
Does 3D product visualization increase conversion rates?
Yes, Industry reports show that it can increase conversion rates up to 94%. It improves customer engagement and reduces uncertainty before purchase.
How long does 3D product visualization implementation take?
Implementation of a simple 3D product visualization usually takes a few days. A full project could take 2 to 3 weeks, depending on the work complexity and volume. A full catalog rollout with custom integrations and configurators can take several months.
Can 3D visualization reduce product return rates?
Yes, 3D visualization is a highly effective way to reduce product return rates. Industry reports show that it can reduce product return rates by up to 40%.
What is the difference between 3D visualization and AR?
3D product visualization is the process of creating 3D models, while AR (Augmented Reality) is the technology that places those digital models into users' real-world environment.
Which industries benefit most from 3D product visualization?
Industries that deal with high-volume and complex physical products benefit most from 3D product visualization. These include industries like furniture, home decor, fashion, footwear, jewelry, automotive, consumer electronics, beauty, and industrial manufacturing.
Can I use 3D models across multiple platforms?
Yes, you can use 3D models across multiple platforms. It can be reused across e-commerce websites, mobile apps, social media, marketplaces, AR experiences, advertising, and virtual showrooms.